|
|


Iona Free-mo Module
My Iona module is a freelanced scene designed and built as a father-son project.
7-year-old Eric wanted structures that "trains could drive into", and the Walthers lumber
warehouse and cement plant kits fit the bill. He also wanted a pasture with horses. Why not?
After searching for real locations using Google Earth, I found a place on the BNSF main line in California's
central valley where an industry with lots of storage tanks stood on one side of the tracks, and another with
warehouses stood across from it. The rural road leading to this site is called "Iona Ave" - and the name stuck.
The Iona module is 48" long, single straight main track, with two industry spurs. Although the module
does not have trackside signals, it does include both current and optical detection for the
Modular Signal System that NorCalF uses to animate trackside signals. All the structures have working
lights, mostly LEDs but some incandescents too. A toggle switch below decks turns them on/off.
Note: Many photos were taken by others - if you see one of your photos here,
please accept my gratitude for allowing me to present it! In a few photos, distracting
backgrounds (people, furniture, weird venue wall decorations) have been "painted out".
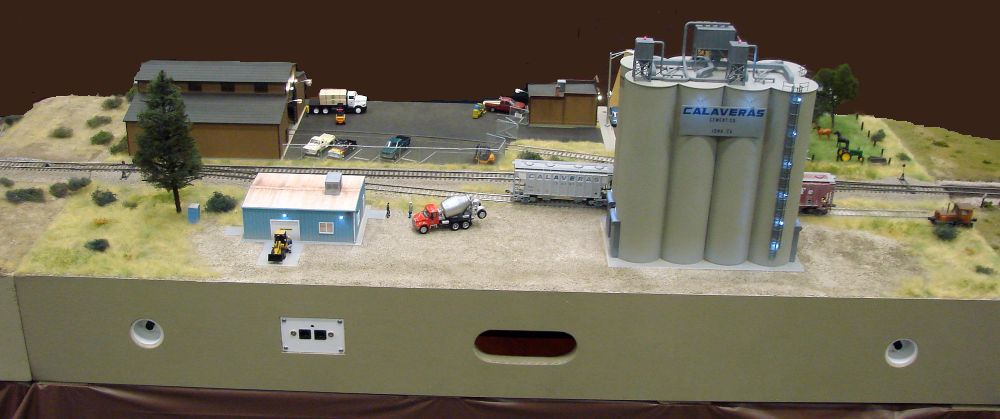
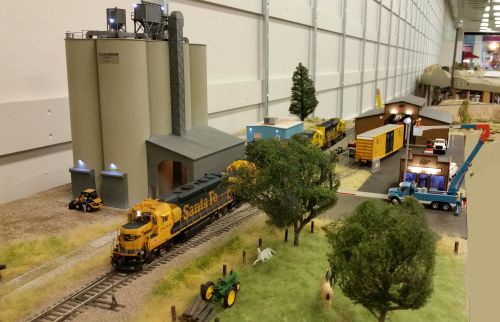
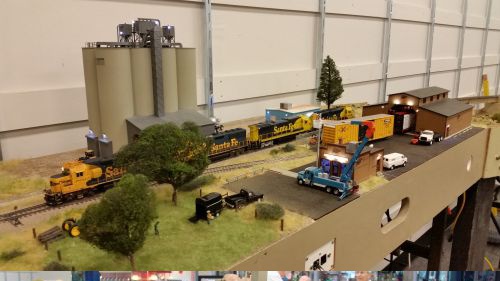
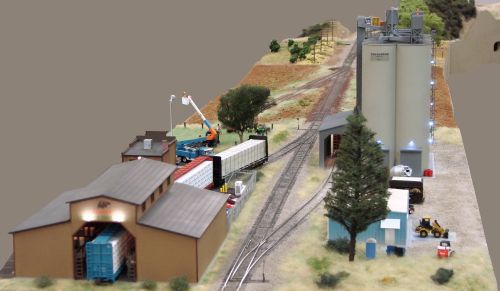
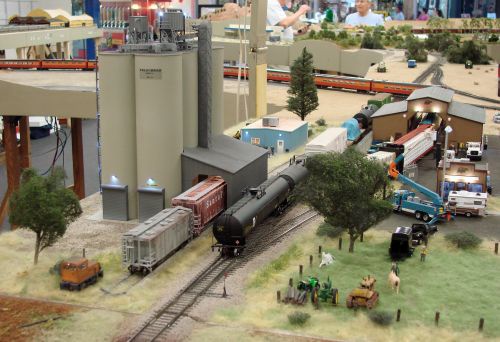
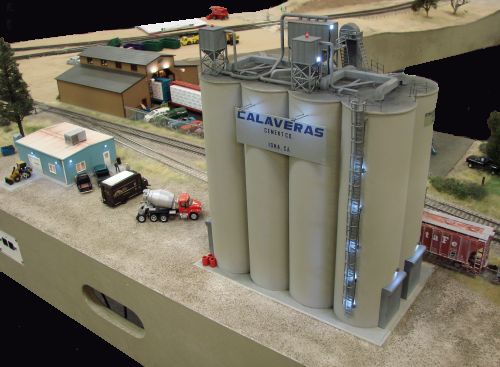
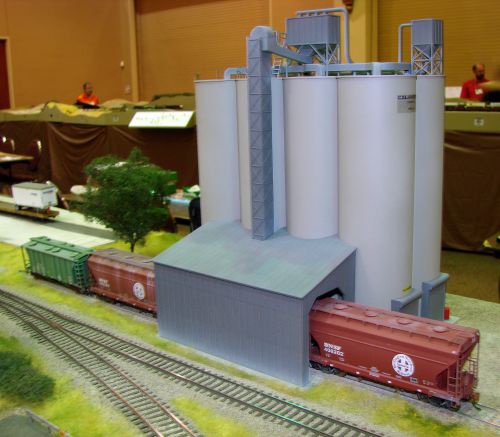
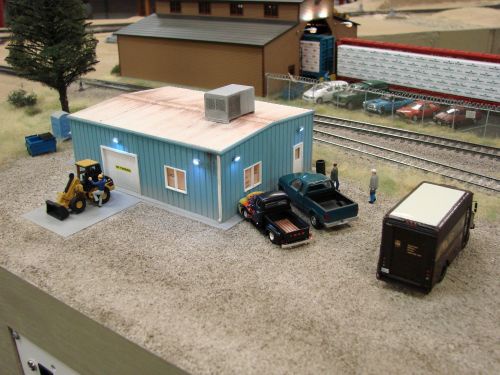
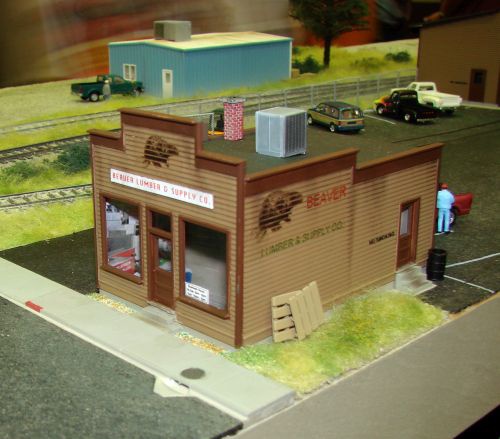
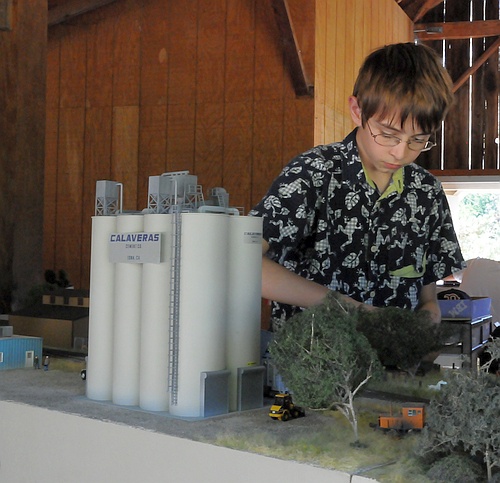
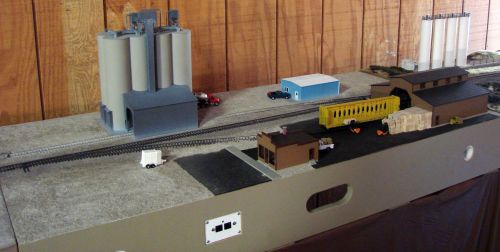
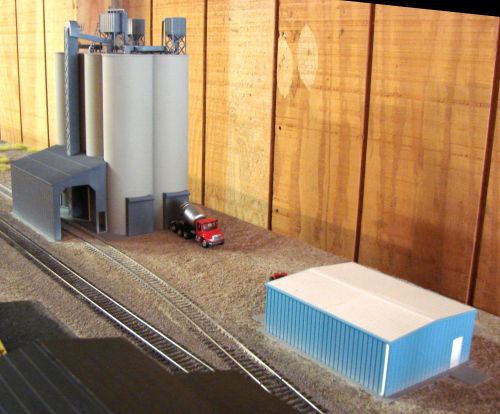
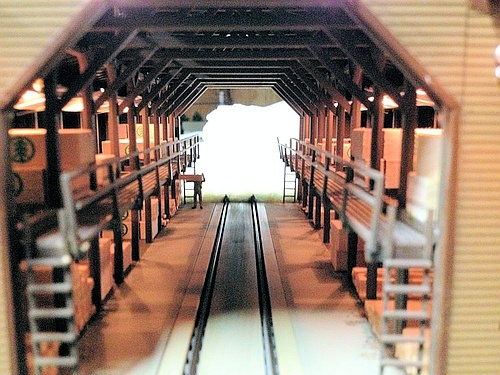
Above: Here is the entire module including the cement plant office (front left), cement plant (front right), lumber warehouse (back left),
and lumber store (back center). The horse field is just visible to the right of the cement plant.
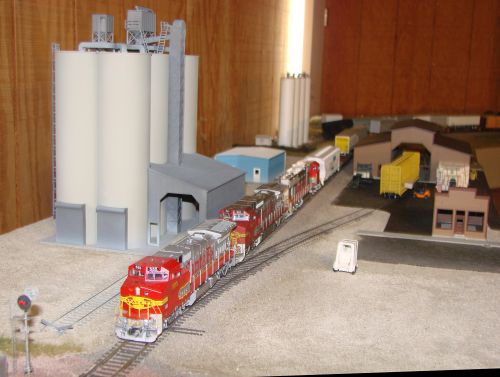
Below: Overview scenes of Iona at various Free-mo layout events.
and lumber store (back center). The horse field is just visible to the right of the cement plant.
Below: Overview scenes of Iona at various Free-mo layout events.
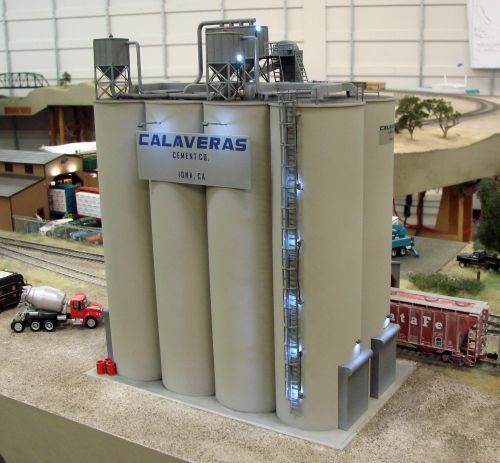
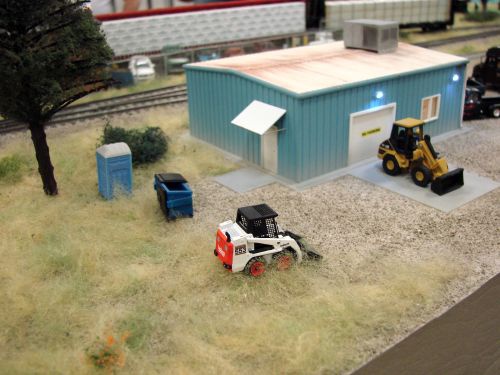
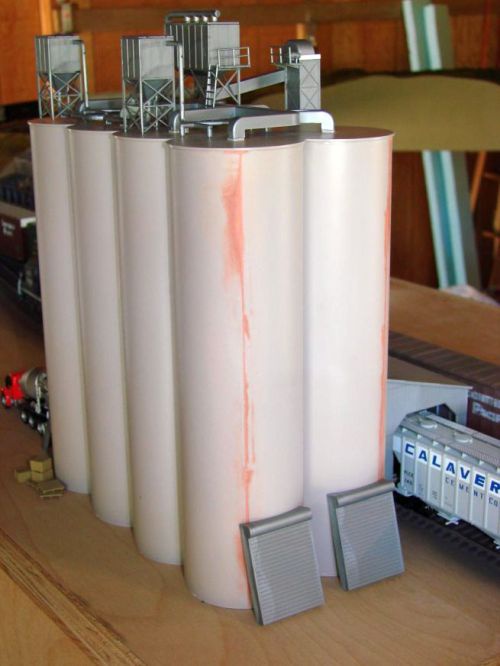
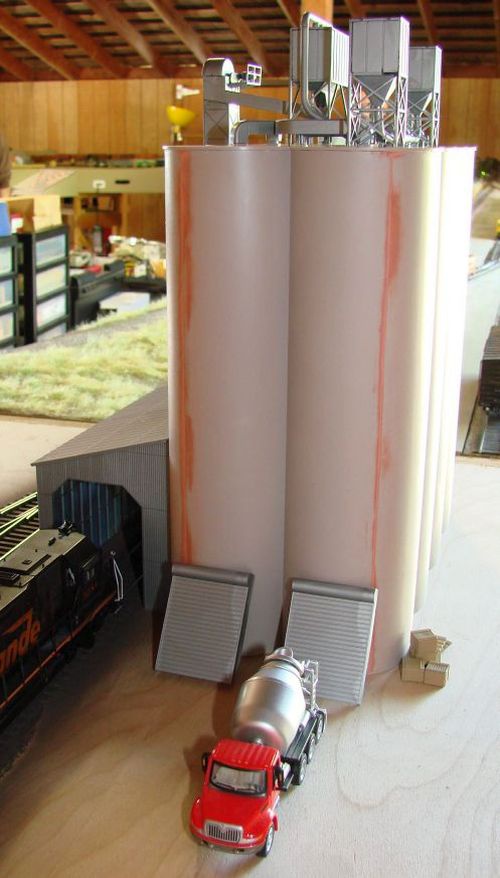
Below: The cement plant is mostly stock, but LED lighting has been added including red flashers on the two rooftop bins.
A ladder and "cage" was added for rooftop access. The Calaveras Cement Co. signs, along with most other signs on Iona,
were created using Microsoft Visio for artwork, printing on decal paper, and overspraying with gloss paint.
A ladder and "cage" was added for rooftop access. The Calaveras Cement Co. signs, along with most other signs on Iona,
were created using Microsoft Visio for artwork, printing on decal paper, and overspraying with gloss paint.
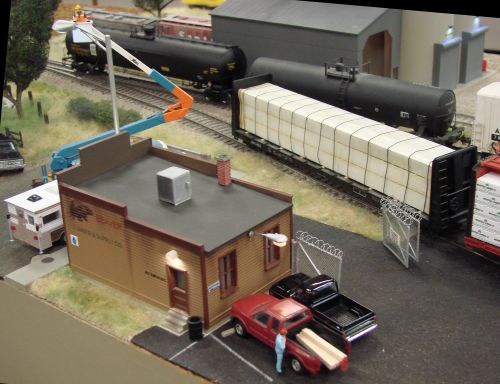
Above: The cement plant office is made from a Pikestuff brand kit with extra details added, including a large A/C unit and
window blinds to beat that central valley summer heat, and LED lights. Iona is a great place to show off HO scale vehicles,
whether they're right out of the box or custom built such as the UPS parcel van and the Bobcat front loader seen here.
window blinds to beat that central valley summer heat, and LED lights. Iona is a great place to show off HO scale vehicles,
whether they're right out of the box or custom built such as the UPS parcel van and the Bobcat front loader seen here.
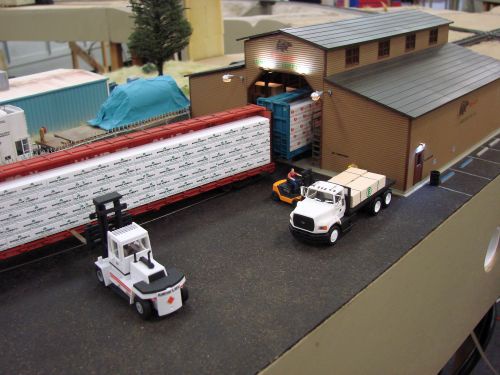
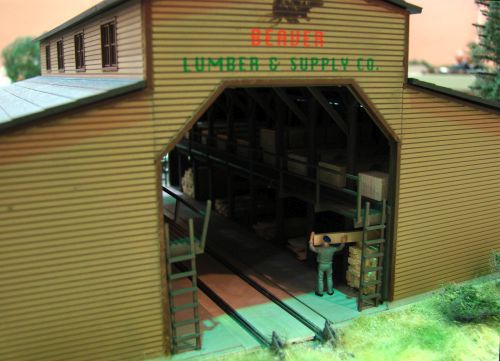
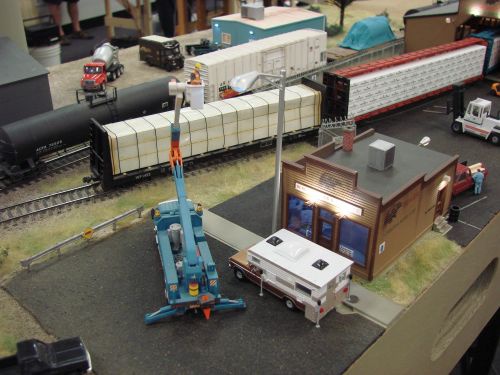
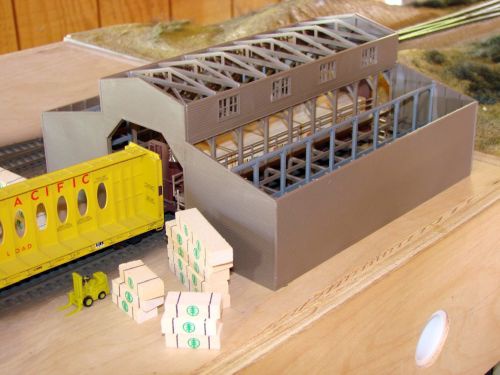
Below: The Beaver Lumber warehouse is the center of the action on Iona, with customer
vehicles dodging the multiple forklifts as they unload flat cars or move materials around
the facility. The interior is fully detailed with racks of fresh lumber and overhead lighting.
vehicles dodging the multiple forklifts as they unload flat cars or move materials around
the facility. The interior is fully detailed with racks of fresh lumber and overhead lighting.
Below: The back side of the store, where
the restrooms are conveniently located.
the restrooms are conveniently located.
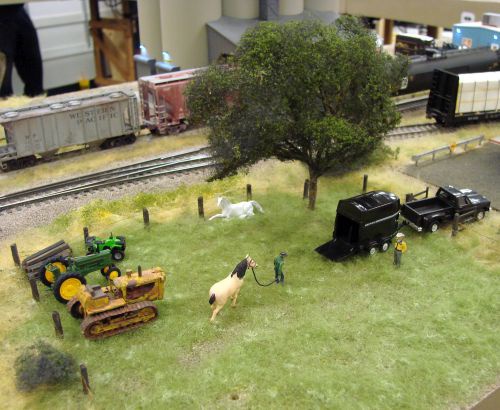
Left: The horse pasture has a shady tree, some old
tractors, and a pile of rough-hewn fence posts. Here,
the ranchers are loading up their prized stallion.
tractors, and a pile of rough-hewn fence posts. Here,
the ranchers are loading up their prized stallion.
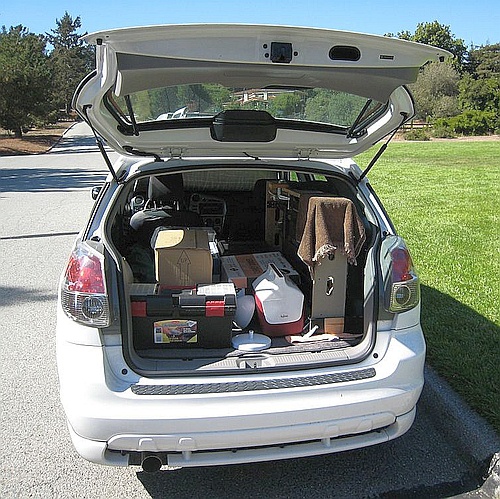
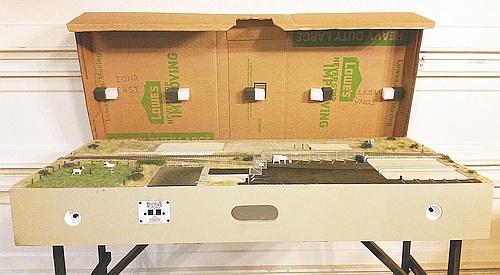
Below Left: Iona fits in my car along with all the
other stuff that goes to every Free-mo setup.
The module now has a travel cover - details are
further down this page.
Below: My son Eric having fun setting out
vehicles on Iona before a setup.
other stuff that goes to every Free-mo setup.
The module now has a travel cover - details are
further down this page.
Below: My son Eric having fun setting out
vehicles on Iona before a setup.
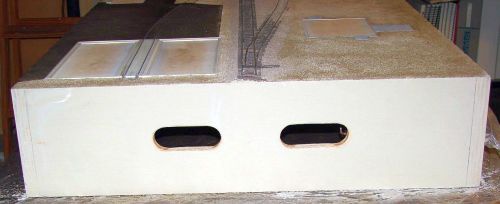
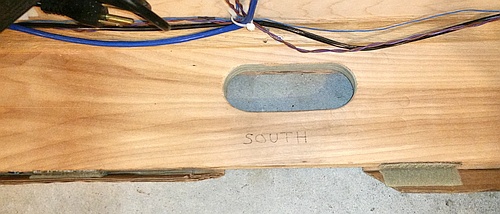
Above: Iona's frame and top are high quality Baltic Birch plywood.
It's a simple box - sides, endplates, and top with no interior
supports necessary. The endplates have two small hand-holds,
leaving the center area intact for C-clamping to the adjacent
Free-mo modules in a layout. Also visible here are the styrene
outlines into which the structures are set. This locks them in
place so they don't shift around, and minimizes the unsightly
gaps between module surface and building foundations.
Above and Below: These overviews show the base ground cover in
place - a mixture of real dirt and dental plaster sprayed with water to
harden it in place. The road and parking lot are made from rolled
asphalt roofing underlayment. This material is thin so it can be torn,
modeling the rough edges of asphalt roads. Note the structures are
very basic at this point - no details, signs, lights, etc.
Below and Right: The cement plant is taking shape. Putty
was used to smooth the vertical seams on the cement silos.
was used to smooth the vertical seams on the cement silos.
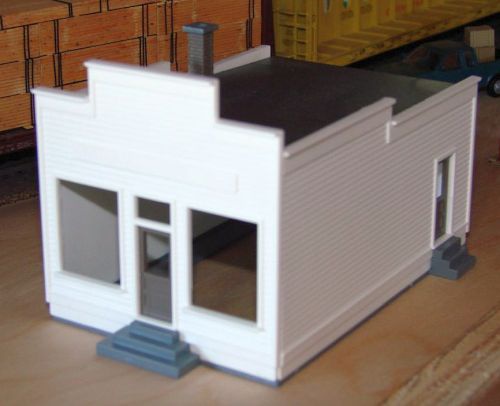
Left and Below: The lumber store after
basic assembly and then painting.
basic assembly and then painting.
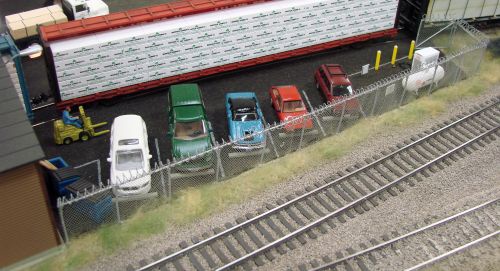
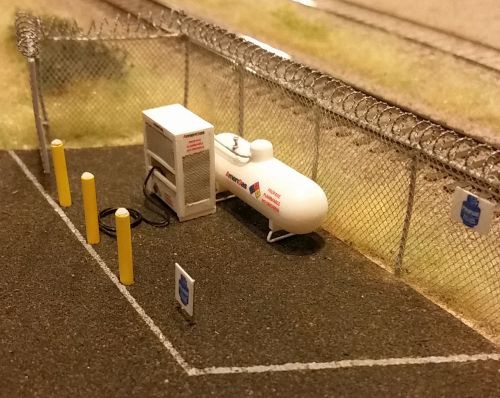
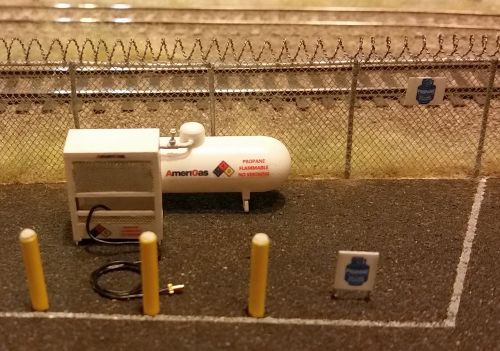
Below: The parking lot has space for several automobiles and
features a propane refill station. The fence is a Walthers kit, the
razor wire is a product used in military and gaming models.
features a propane refill station. The fence is a Walthers kit, the
razor wire is a product used in military and gaming models.
Left: A working Walthers plug-in streetlight stands out
front the store, here being serviced by PG&E. The light
turns on with the rest of the building lights.
The guardrail at the end of the road is a Pikestuff product.
The camper was customized from an old Lindberg model
to capture the family RV from my childhood.
front the store, here being serviced by PG&E. The light
turns on with the rest of the building lights.
The guardrail at the end of the road is a Pikestuff product.
The camper was customized from an old Lindberg model
to capture the family RV from my childhood.
Below: This propane refill station is a recent addition to the Beaver
Lumber parking lot. The pump box, bumper posts, and signs are
scratch-built, while the tank is modified from an Evergreen Products
item. Custom decals were made from images found on the web.
Lumber parking lot. The pump box, bumper posts, and signs are
scratch-built, while the tank is modified from an Evergreen Products
item. Custom decals were made from images found on the web.
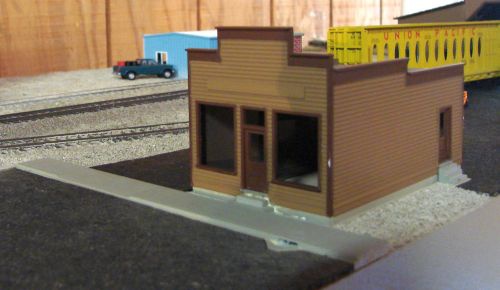
Below: The lumber store is included with the Walthers lumber
warehouse kit. A false interior was made by printing out a
"store scene" found on the internet, bending it into a curve,
and placing it behind the big front windows. The sidewalks
are another Walthers product. Note the storm drain in the gutter.
warehouse kit. A false interior was made by printing out a
"store scene" found on the internet, bending it into a curve,
and placing it behind the big front windows. The sidewalks
are another Walthers product. Note the storm drain in the gutter.
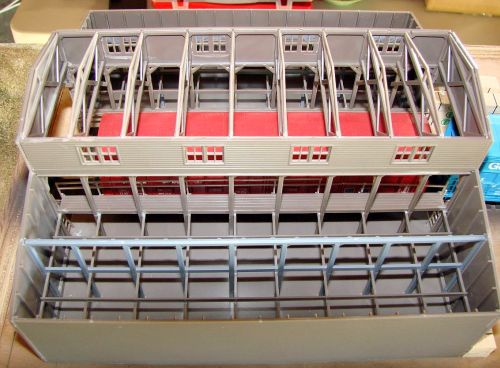
Below: The lumber warehouse after basic assembly. All the interior detail, custom painting, and
weathering is yet to come. The roof panels are left loose so they can be removed to show off the interior.
weathering is yet to come. The roof panels are left loose so they can be removed to show off the interior.
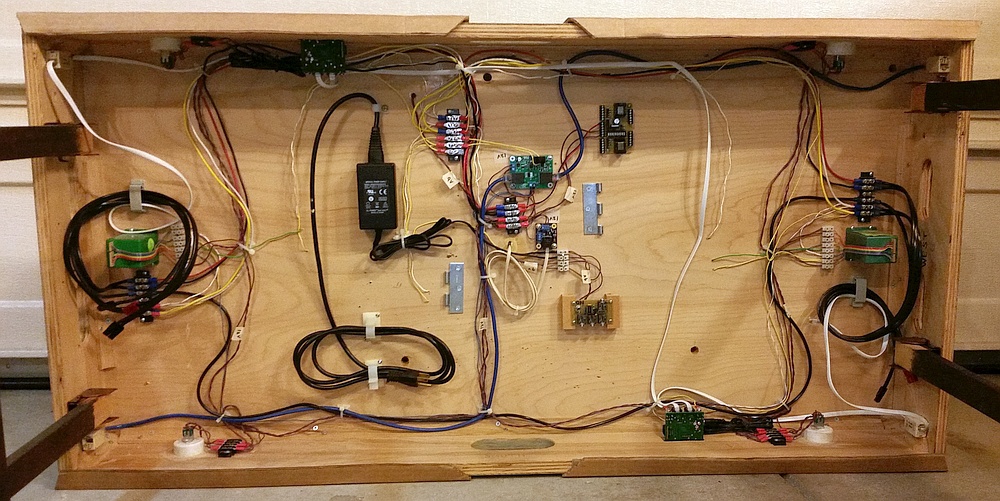
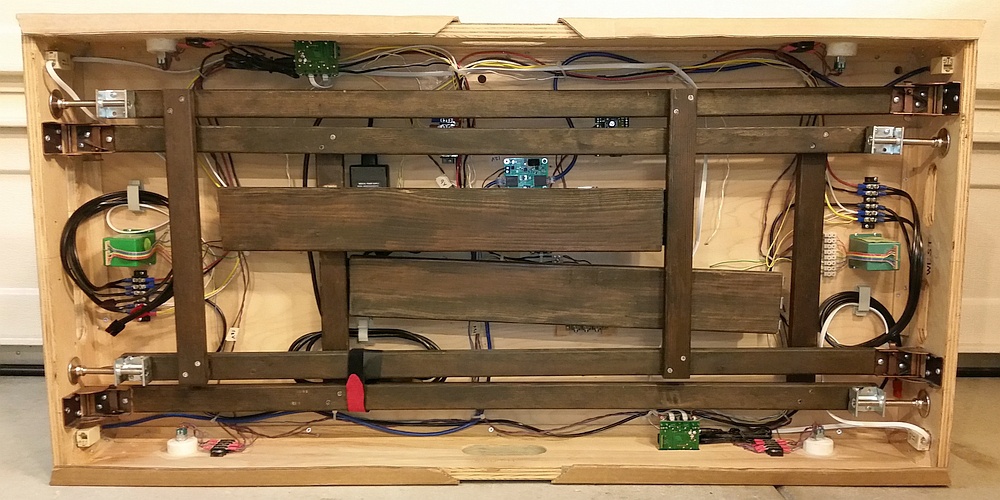
Below: The underbelly of Iona reveals the electrical gear and wiring typically found in a Free-mo Module.
Iona has a few extra items to support the building lights, such as the wall-powered 9-volt power supply
(black) and hand-wired board where the building cables plug in. This board also has a flasher circuit
for the red warning lights atop Calaveras Cement, plus a master on/off switch for the lighting system.
The lights consume quite a bit of current which is why I chose to power them with a dedicated power
supply, rather than tapping into the Free-mo Accessory Bus (red and black wires).
However, occasionally a setup provides no way to plug in the power supply to wall power.
So to ensure the Tortoise turnout motors (green boxes near each endplate) and the Modular Signal
System (MSS) occupancy work no matter what, I have powered them from the Accessory Bus via an
older-model OBUB2 that has a built-in 12VDC regulator. The other functions of the OBUB2 are not
used (keep reading ... ).
Iona has both a current detector and an optical detector for the MSS. This will allow me to more easily
add an "intermediate" bi-directional trackside signal, if I choose to in the future. I would make the signal
removable so it can be optional in any given Free-mo layout. The flexibility of the configuration switches on the Scale Nature Company OBUB3 (green board, center) will allow me to change Iona from a MSS Cross-over node to a MSS Cascade node on the fly.
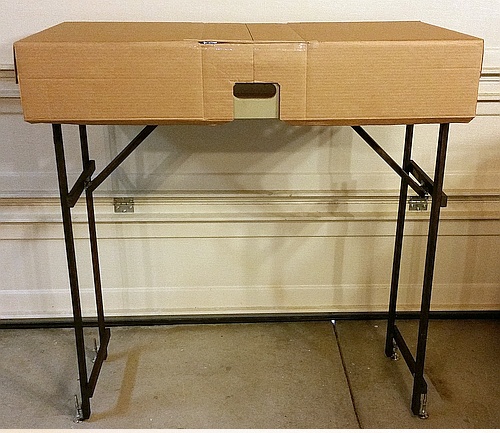
Though the buildings, trees, and vehicles are removable and packed separately, a number of low-profile items
are permanently mounted to the scenery including switch stands, fences, figures, trash bins, porta-potty, and
so forth. This reduces setup time but risks damage to these fragile details when the module is stored and in
transit. To protect them and the trackwork, I made a light-weight cover out of a sturdy shipping box.
Below: The cover's lower edges fold under the fascia
bottom lip and velcro in place using the same velcro
patches that hold the display skirting at setups.
bottom lip and velcro in place using the same velcro
patches that hold the display skirting at setups.
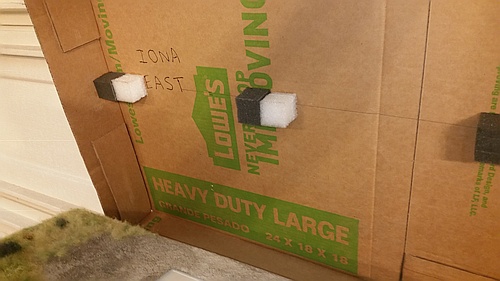
Below: I dissected and re-assembled a Lowe's brand
24x18x18 heavy duty shipping box. Foam blocks glued
along the inner centerline rest on the track to prevent
inadvertent pressure on the cover from crushing taller
details like the fences and switch stands.
24x18x18 heavy duty shipping box. Foam blocks glued
along the inner centerline rest on the track to prevent
inadvertent pressure on the cover from crushing taller
details like the fences and switch stands.
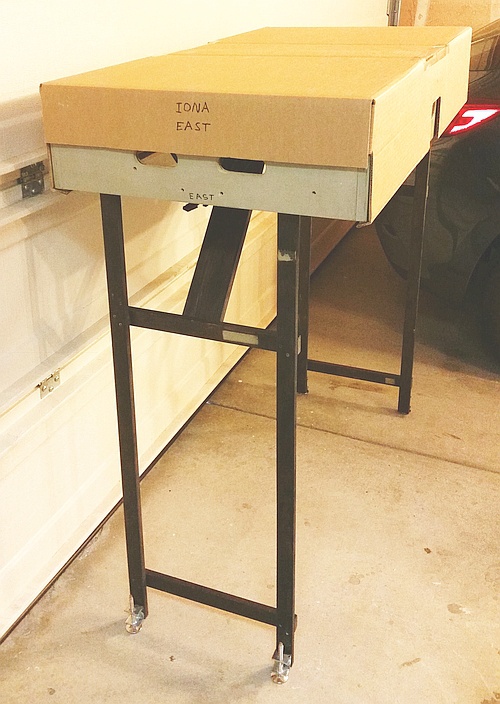
Above: This 3/4 view shows the folding legs
and adjustable-height feet when deployed.
Lee Valley hardware products were used.
The angled brace provides stability when
fine-tuning the module height.
and adjustable-height feet when deployed.
Lee Valley hardware products were used.
The angled brace provides stability when
fine-tuning the module height.
Below: The folding legs neatly tuck into the underside of Iona for storage and transport. Note how the
Lee Valley folding leg brackets are used in a different way than usual - they are mounted directly to the
endplates and are "open" when the legs are folded, and "close" when the legs are deployed. This was
necessary for this 4-foot long module; otherwise, the legs would not fit up inside the frame.
I use the 4-inch length Lee Valley leveller feet, which have a 3-inch usable adjustment range. This
allows Iona to adjust from 48.5 to 51.5 inch rail height - more than the Free-mo standard requires -
as long as the Lee Valley leveller brackets are mounted in the right spot at the base of the legs.
The leg verticals and cross-braces are 1x2 "clear" douglas fir (no knots), which is harder (i.e., stronger)
than pine but still reasonably priced. The angle members are 1x4 douglas fir - these need to be wider so a full-sized door hinge will fit at their ends. The angle braces are permanently attached to the upper
1x2 cross-braces with a door hinge so they can fold in for storage. Their free ends have half of another door hinge, and their mating halves are mounted to Iona's underside. When deploying the legs, I mesh
the two hinge halves together and slide in a large nail that is bent 90 degrees at the "head" end,
forming a handle. This is much easier to remove at tear-down than using the hinge's native pin, which
is too difficult to get ahold of.
The wood is stained black ("mahogany") to make the legs less noticeable during a setup. I use stain
instead of paint because it soaks into the wood and doesn't show chips or dings as paint would.
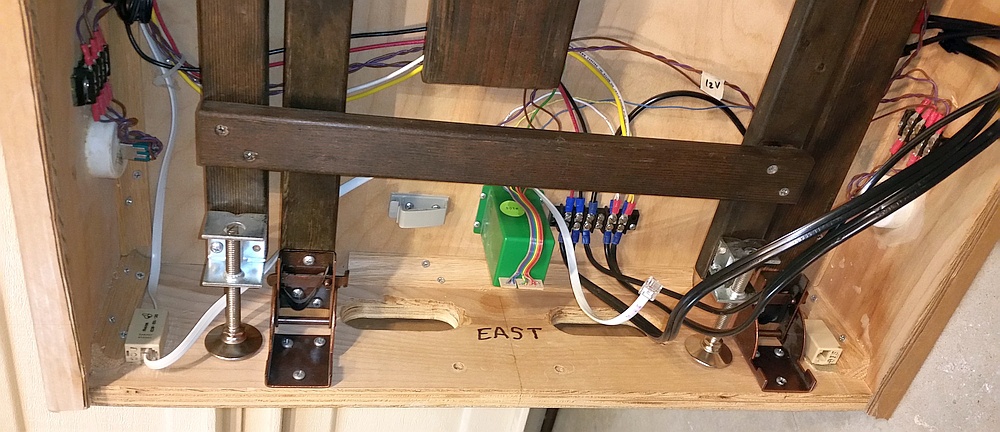
Below: This closer view of one endplate shows how the Lee Valley brackets are mounted,
and how tightly the legs fit into the frame when stored.
Some of the electrical gear is also visible - left to right:
The black terminal strip provides serviceability for wiring to the DPDT pushbutton turnout control
mounted in a PVC end cap (white) which is glued into a hole in the fascia. This method recesses
the pushbutton to avoid damage by passersby or when the module is resting on its side.
The Digitrax DCC LocoNet 6P6C modular jack (beige) is velcroed to the endplate making it easy
to change out should it ever get damaged (the white cable heading off to the right is the jumper that
goes to the adjacent module).
Near the center is a gray clip for securing the Free-mo cable pigtails during transport.
Next is a Tortoise turnout motor (green); I used ribbon cable soldered to its native board which
runs down to a terminal strip (hidden behind the leg cross-brace) for serviceability.
Another terminal block is where the Free-mo bus pigtails for Track Power, Accessory Power,
and Booster Commons are attached.
Finally at lower right is a 8P8C modular jack (beige) for a MSS Occupancy bus cross-over
cable jumper to the next module.
-- About
-- Contact
-- Diesels
-- Links
entire website copyright Gregg Fuhriman
created with CoffeeCup Visual Site Designer
created with CoffeeCup Visual Site Designer
-- Layouts
-- Modules
-- Signalling